Technology in SSB 2312
Jabra Pancast conferencing technology
- Eight professional grade mics remove background noise to provide a more clear meeting experience for those in the room and those joining remotely.
- Three new 13-megapixel cameras have been installed to provide a wall-to-wall field of view in the room.
- A remote (that looks like a hockey puck) has buttons to mute/unmute, adjust volume and camera zoom, and automatically centre camera on the active speaker.
ScreenBeam
This allows users to wirelessly share and mark up content on the room display without requiring an app or a physical connection. Instructions to connect are shown on the default screen as soon as you turn on the TV
The outsource port to use this device should be in HDMI 2!
This section explains how to connect(project only) a client device(Notebook – BYOD) to ScreenBeam 1100 Plus using Wi-Fi Miracast Protocol.
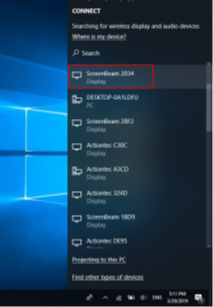
1) Select the ScreenBeam receiver name as shown on the TV display.
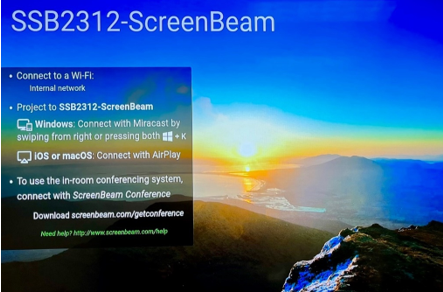
2) For Windows 10 or 11 | Select Connect from the Action Center by swiping from right or simultaneously pressing the Windows key ![]() and K key.
and K key.
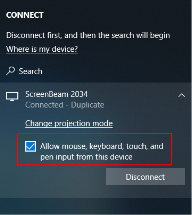
3) Enter in the PIN on the screen if required. If the PIN code is not displayed, try the hidden PIN 1234 (default).

- To disconnect press the Windows key
 and K key, then click on Disconnect.
To project and conference(Teams or Zoom) your screen, you will need to Install an application called: ScreenBeam Conference. The installation file is here:
J:\FM-IT\Software\ScreenBeam Conference\ ScreenBeam_Conference.msi
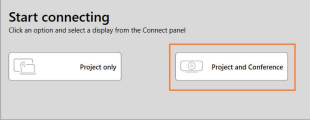
Once the software is installed, perform the following steps.
1) On the notebook, open ScreenBeam Conference from the Windows Start menu or the system tray
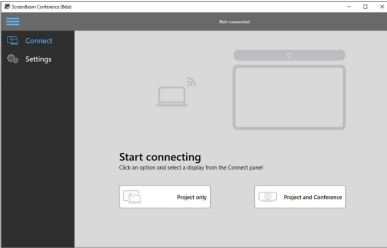
2) Select the Project and Conference option
3) Windows 10 or 11 Connect panel will appear showing a list of available devices
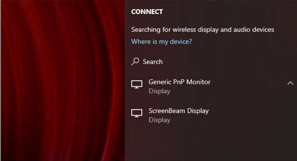
4) Select the device that matches the ScreenBeam receiver’s name as shown on the display.
5) The laptop will proceed and connect to ScreenBeam receiver.
6) Enter the PIN code to connect (the PIN is shown on the TV screen).
7) Once connected, the app will display the connection status (you may see the tutorial guide if it is the first connection).
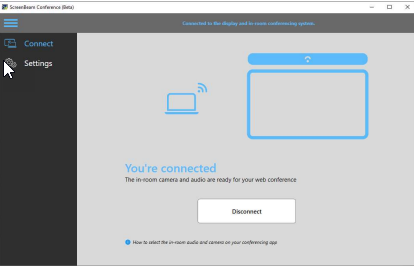
The laptop is now connected to the USB peripheral devices and in-room display!